
Week 5 - TKOs (page 40)
- Kristen
- Feb 21, 2021
- 14 min read
Updated: Feb 22, 2021

Welcome to week 5, everyone! This week was a doozy. I think the cover photo proves it 😅
Edit: Redemption achieved two days later! You'll see edits in bold in the cookie filling section, cookie as a whole section and at the bottom where I share my redemption story and pictures.
To skip my babbling and go straight to the food, click here.
To jump to the cookie dough, click here.
To jump to the cookie filling, click here.
To jump to the cookie as a whole, click here.
To skip it all and read the conclusion, click here.
To skip everything and read how I redeemed myself, click here.
As always, the photos are at the end of each of their respective sections but there are a couple of gems scattered through the post this week. Also, this is my first time posting videos so if there are any issues, please let me know in the comment section below!
Week 5! Hello, everyone! As posted on our Instagram, it was my fault Jenn and I didn't post last week but, to be frank, I'm not really sorry. I'm sorry we didn't have content for you but I'm not sorry about asking Jenn for the time to be with family and the people I care about.
Jenn and I have been on the same page with this project - it's for fun and it should be enjoyable. Yes, sometimes we have to push ourselves even though we've had a busy week but a challenge is still fun. Making the people I care about feel like a side-project is more important than they are is not so fun to me so a big thank you to Jenn for understanding and a big thank you to our readers as well. Everyone is well and things are back to normal (as normal as things can be with the world around us) (:
Enough about my week. On to the food!
TKOs were the recipe this week and I definitely feel like I got KOed in the kitchen but hey, it's a learning experience! Part of the fun of this blog was not only to celebrate our successes but also to learn from our mistakes and show people we're only human. Jenn and I both knew going into this project that there would be some recipes that we would struggle with. This is the first recipe to really give me any trouble so be prepared for some not-so-pretty photos as I share my first failure with you!
Edit: I fixed my failure! Click here to jump to my little redemption journey.
TKOs - The original recipe
This week we made TKOs - a sandwich cookie that pays homage to Oreos. I was super excited because Oreos are my favourite cookie and I've never tried making them at home. However, I was a little wary because I've read some poor reviews of this recipe and Jenn mentioned a bit of trouble with the dough. Lucky for me, Jenn's been super on top of things this week and I got a few tips on what to expect.
Here's a glimpse into what our conversations look like:

This is why I love Jenn. 😋
I proceeded with following the recipe as I would have pretending I didn't get a sneak peek of what I was in for from Jenn.
*Side note: What Jenn mentions about rolling the dough before refrigerating is something I always do. I did a test batch of cookies a few years ago, forming one ball of dough into a 5x7" brick, refrigerating then rolling out versus rolling the second ball from room temperature then refrigerating and baking. I didn't notice a difference. Perhaps people tell you to refrigerate before baking because they feel the dough needs resting (which is a crucial step in some recipes) or because it seems a 5x7" brick will take up less room in the fridge. However, I've stuck with rolling the dough out at room temperature because it's easier to work with and any difference between the two methods (in applications such as pie/tart dough and cookies) was negligible so that's the method I've stuck with.
Chocolate Shortbread Dough:
I did my usual scaling of ingredients and followed the instructions. Everything was fine until my mixer didn't want to mix the dough anymore. I had to dump everything from the bowl onto the counter and mix it by hand. Initially, it didn't want to come together but using my brain, I thought to let the warmth from my hands soften the butter even more and that helped me form a cohesive dough with few crumbs that I could roll out between parchment. Had it not been for Jenn, I would've been worried about how much I needed to work the dough to get it to cooperate.
This dough really liked to eat up the parchment paper while I was rolling so to anyone who reads this post before attempting the recipe, do not let the dough get caught and creased in the parchment paper. This is important for any dough you roll between parchment but this one especially because of how thin the dough is - roughly 3mm thick.
Everything went well with the rolling and refrigerating. I had to make sure I pressed down a little harder than normal to get the fluted design to come out clean but it's so satisfying when it works. It's always worth the little bit of extra effort to make your product look and taste better. After all, we do eat with both our mouths and our eyes 😋
*Just a tip for dough that needs to be refrigerated and rolled between parchment - after pulling the dough from the fridge, release the top and bottom sides of the dough from the parchment before you continue with rolling or cutting. Doing so makes it easier to release any shapes you may need to cut. It's harder to release small shapes from parchment as opposed to releasing an entire sheet of dough. Simply pull the top parchment off, lay it back on exactly as it was, flip it over (with the help of the back of a sheet pan or cutting board so it doesn't crack in half) and release the parchment that was on the bottom. You can flip it over again if the top is nicer and that's what you'd like to see on top but either way it just makes life easier (for me, anyway).
Baking the dough was a bit of a challenge and worry in the beginning, especially for someone like me who usually depends on the colour of the cookie to know when it's ready to come out of the oven. Since these cookies are so dark, it's impossible to tell when they're ready based on colour. This time, I had to work off of the time that Keller suggested in his book. He instructs us to bake these cookies in a standard oven at 325°F for 15-17 minutes. Luckily for me, his timing was pretty on point. I baked mine for 10 minutes then turned them and baked for another 6 minutes. Lucky me, this timing worked and I stuck with it for all 5 batches I baked!
My observations:
The cookies were dark before going in the oven and they were just as dark coming out.
The cookies had a fair amount of butter in them so they were noticeably crumbly and relatively delicate so I had to handle them carefully.
They smelled delicious and not too sweet so I wasn't worried about the filling in the middle being on the sweet side.
The cookies puffed up a little when they baked in the oven. My brain kicked in a few batches later so to rectify the little puffed up tops, I took a silicone flipper and pressed down on the cookies evenly to expel the air and voilà! An even, flat cookie.

Left: Baked and pressed with flipper cookies
Vs.
Right: Baked and left to cool cookies
My partner, H, sampled these cookies with me.
Our conclusions:
Delicious! Not too sweet and had a deep cocoa-y flavour to them thanks to the dutch-process cocoa that was used. (I wanted to use black cocoa like Jenn and thought I had some in the pantry but didn't and didn't have time to go out and purchase any.)
Crumbly when you bit into them but not the same kind of crumbly we got from the Better Nutters. Those were a messy crumbly. These were a crumble in your mouth kind of crumbly. I hope that makes sense 😅
I'm super happy about these cookies. I'll definitely use them for other applications or even just snack on them on their own.
H: "The cookie itself? The cookie itself, it was like how a fresh Oreo should taste. So, not something that has been in plastic wrap for months on a shelf. It had a good crisp to it without being too crumbly. Chocolate flavour was good and a had a nice buttery taste on the palate. It was rich and decadent - an elevated Oreo. It was smooth on the palate - no graininess - almost like a cookie that becomes a mouth-full of chocolate. Would love to try it with a glass of milk and dunk it to see if it holds up."
Photos of the Chocolate Shortbread Dough:


I promise the three photos of the cookies in the oven were all taken at different times 😂
White Chocolate Filling:
This filling was much easier to make than the buttercream filling. There was no meringue and no sugar syrup. 3 ingredients: white chocolate, butter and whipping cream. I like it. Super easy and I love all three of those ingredients so I was excited!
It was easy enough following the instructions for the filling recipe but the questions started piling on when it came to beating the filling. The book simply tells us to "place the filling in the bowl of the mixer, fitted with the paddle attachment, and beat until smooth" (page 40) but another one of Jenn's tips was not to whip cold ganache or it would break. This came from our ever-so-studious Jenn who found another blog where people baked through the same book as us (http://bouchonbakerybookproject.blogspot.com).

Now my brain started doing its thing. I'm almost always determined to try a recipe exactly how it is the first time before I start tweaking things so I know what I can change and what I shouldn't mess with.
It wasn't a surprise to me that the book instructed us to beat the filling until smooth without mentioning to bring it to room temperature because every whipped ganache I can remember working with I whipped when it was cold. Now someone's telling me that whipping ganache when it's cold will cause it to break? Was I just lucky every time I whipped cold ganache? Have I been doing it wrong this whole time!?
I asked Jenn to clarify and she mentioned her filling broke. I feel like she'll mention it in her post so I won't go into her process any further. I just knew I needed to try whipping cold ganache straight from the fridge and ganache that had time to come up closer to room temperature to see if I could find a difference.
*Taking a break to whip up the filling now.
*2 hours later.
I give up. For now. I want to get this post out on time and I have some pressing things that need to get done so I'm giving up for now and hopefully posting an edit later on.
When I initially put the filling in and started beating it, I thought, "hm, what's Jenn talking about? This is whipping up just fine!" Then I tried to use it and it came out too cold to pipe smoothly. To rectify this, I first tried to warm up the piping bag with my hands to see if that would help with making the filling come out smoother. It worked a little bit but still not well enough so I tried one more time to warm the bag with my hands. That was a mistake. It started to come out grainy and I could see it wanting to separate.
I remembered Jenn's advice about warming it up so I threw everything back into the mixer and mixed it on medium high with my hands around the bowl to slowly bring up the temperature. Almost 10 minutes later and it looked like it was starting to get better! A sense of relief came over me and I tried to use the filling. Nope. It separated beyond repair (at my amateur level at least). It separated enough that when I tried piping it, whatever water content was in it was seeping out and you could clearly see what was filling and what was seeping away from the filling.
What I initially thought was an easy filling ended up being the saddest fail I've had in a little while. It's humbling to have something not go your way. Not that I needed to be humbled but still, it's a good reminder that there is always so much to learn.
My observations:
The filling started out looking smooth. Yay! But then it separated. Yar. 😒
The filling separated beyond repair. Yaryar. 😒😒
I sampled a very small amount of this filling with H.
Our conclusions:
Yaryar.
Edit: Not yaryar! Sweet, but not yar!
This recipe needs work and/or more specific instructions because many people have had problems with it.
Edit: This recipe needs more specific instructions! Something along the lines of "beat with paddle attachment at room temperature, not cold" would have been very helpful.
H: "It was too runny. Consistency was almost sort of pudding-ish. If the cookie tasted like what a fresh Oreo would taste like, this filling tasted like what Oreo filling sitting in the sun would taste like."
Edit: H: "oh, much better."
I can't really say more on it other than I wish Keller would've stepped up his game for this cookie filling. The cookie was delicious and so many people were excited to try this recipe but the filling made for a very disappointing overall experience for this cookie.
Edit: I still think this is a very simple cookie filling, but that's not saying it's bad. Simple can be good. I just wish this simple filling was more reliable. Perhaps it's the chocolate? I'd like to try making this again with a different brand of white chocolate or perhaps even Cacao Barry's Zephyr Caramel White Chocolate because it's one of my favourites and I think it'll help cut the sweetness of the filling and add some complexity and depth to it.
Photos and videos of the filling:


Straight from the fridge, into the mixer. Thought it was all good! Nope. I was wrong.
Tried to fix it. Thought I made some progress! Nope. Still wrong. (Please forgive my super shaky recording. I was trying to record with shaky hands while holding the camera and warming the bowl 😅
Thought I finally fixed it! Nope. Maybe it was fixable but I took it to the point beyond repair. I just didn't know it at the time.
The Whole TKO Put Together:
Putting this cookie together was similar to the Better Nutters - pair cookies, flip half of them over, pipe filling and sandwich cookies together. Piping the filling is was the only difference in technique between the two sandwich cookies. These cookies use a small, plain, round tip to pipe the little teardrops so you can see what looks like little pearls in between the cookies.
My observations/thoughts:
Edit: The filling melts quite quickly if you have warm hands so beware the filling that was close to your hand in the piping bag as it may come out a much more runny texture than what was not warmed by your hand.
The cookie looks pretty and does resemble and Oreo.
The cookie holds its shape a bit better after being refrigerated so the filling has time to set.
H sampled these cookies with me though we were both reluctant to.
Our conclusions:
This cookie as a whole has no redeeming qualities. I potentially messed up the filling so far beyond repair that the delicious cookies couldn't even save the cookie as a whole.
Edit: The cookie was much better! Confirmed: I did mess up the filling so far beyond repair that it ruined the entire cookie. This cookie is tasty but I would still like to see the filling and cookie itself mesh better together. I would still like to tinker with this recipe.
Upon eating the cookie, there was an initial sweetness from the filling and depth of flavour from the cocoa in the cookies that made me pause but that was quickly pushed aside when I noticed a strange film coating my palate. It definitely didn't come from the cookie as I snacked on a few cookies on their own so it had to be coming from the filling. Again, I accept responsibility for the monstrosity of a filling I created. I won't blame the recipe just yet because when it was a freshly made ganache, it tasted sweet which I feel would've been good with the cookie.
Edit: The strange film was definitely caused by how unfixable my filling was. I do not blame the recipe. It was my fault.
H: "Did not make me wish my childhood Oreos tasted this way. While the cookie was good on its own, the filling was neither good by itself or between the cookie layers. As a composed cookie, it lacked the playfulness of what an Oreo embodies - it simply tries too hard and misses the mark."
Edit: H: "After you had made your changes to the filling, the cookie was delectable. The cookie, the crumbliness was held together a little bit better with the filling. The filling did not leave any coating on the palate but instead mixed in with the chocolate to create a nice balance between the bitter from the dark chocolate and the sweetness from the white chocolate. Loved the proportions of the thickness of the cookie with the filling. I think I like it more than the original."
Photos of the TKOs:


Filling attempt #1: The filling was too cold and wouldn't stick to the cookie. Every time I lifted the piping tip up, the filling would follow it hence all the little cookie bits you see in the icing.
Filling attempt #2: The filling warmed up a bit but still didn't want to stick to the cookie so I saved a bit of time and just swirled in the filling.
Filling attempt #3: The filling was warmer and starting to stick to the cookie! Yay! But then I reached the end of the filling in the bag and my hand had melted it so it puddled in the middle.
Filling attempt #4: The filling had been mixed in the mixer for a good 10 minutes. It looked like it came back together but nope.
Filling attempt #5: The filling was too liquid to pipe properly and the separation was very obvious at this point. This was the end of me trying to fix the filling.


Left: The saddest cookie stack so far 😂. These cookies were from the batches I baked before realizing that pressing them with a flipper would help flatten them out. From top to bottom of the cookie stack in order of attempt: 3, 2, 1, 5, 4.
Middle: The first 3 attempts of cookies that were not right and hard to pipe but not yet to the point of fat and liquid separation.
Right: The last 2 attempts of cookies when they were too far gone and clearly starting to separate. Note the dripping from the liquid that separated from the filling.
TL;DR Conclusion:
The cookie dough does come together with a bit of elbow grease and the cookies were fun to make especially with the fluted cutters.
The filling was a nightmare but I can accept that it could've been my fault. Until I try again and redeem myself, I will take the blame. The filling and I cried together.
The cookie on its own was delicious but the cookie with the filling did not make me wish I had these over Oreos.
Back to the drawing board for this filling but the cookie recipe is a keeper!
Thanks for reading! Have a wonderful week, everyone!
Edit: Redemption! Here's basically what happened, explained in a conversation with Jenn after making the first batch.


That pretty much sums up what happened after the first round and shows you more Jenn awesomeness because she just gets me and cares about me even though I say stupid things like, "yar."
Also, side note, this just happened:

My computer understands me, too 😂
Anyway, back to the food! I took Jenn's advice and left my filling to come up to room temperature before trying to put it in the mixer to smooth it out again. It worked! It still had a few little bits that I could see but I didn't want to push it.


Left: Room temperature filling in the mixer bowl.
Right: After beating the filling until it was smooth.
The filling was definitely usable. I just mixed it by hand for a little to try and get rid of a few irregularities I saw after beating it with the mixer because I didn't want the mixer overworking it and causing it to separate again.
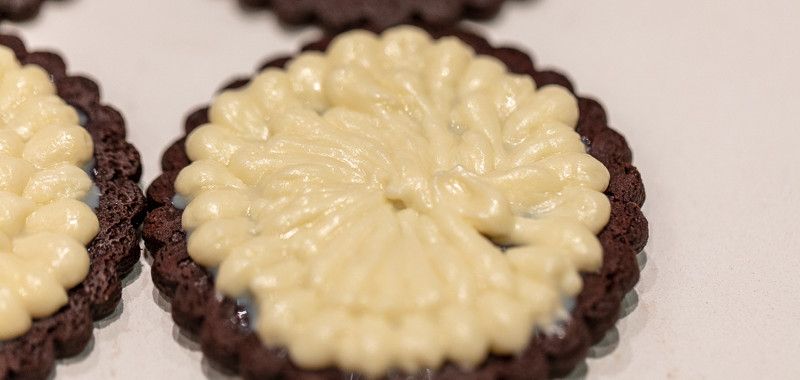
I piped my first ring around the cookie and it was *much* better than the first round I piped! I'm definitely in need of practice but there was noticeable improvement from the first cookie to the third cookie.

First ring of filling piped. The filling didn't separate! Just needed to learn to angle the piping tip so that it was more at a 45° angle instead of being parallel to the cookie. The angle helped push the filling in its place so it had room to stick. You can see the little bits of filling that left a trace when I pulled the piping bag away and it dragged a bit of the filling.
To save you from scrolling up and down, these are the cookies I piped the first time:
These are the cookies piped the second time:

Clearly a big difference between the first batch and the second batch! I'm so happy. It was definitely worth the second try!
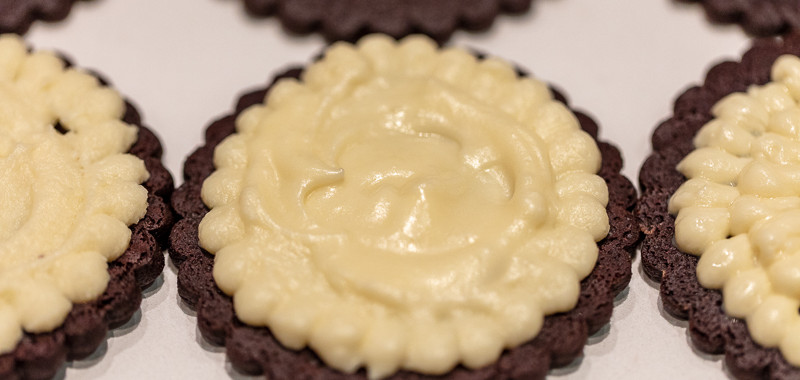
Here are close ups of the three cookies from the second round. You can see how with a little bit of practice, there is some improvement!


Left: first try. Middle: second try. Right: third try.
And here's my redemption cookie!


Thanks again for reading! And again, have a wonderful week, everyone!


Comments